

PhobVision is a feature included in PhobGCC mainboards version 2.0 and newer that allows the user to change the controller calibration and settings in a graphical user interface available on any CRT TV or other displays that have a composite video (CVBS, yellow plug) input.
For a demonstration of how PhobVision works, please refer to CarVac's video below:
With the official installation method, as described here, there are a few downsides compared to not opting for getting PhobVision installed:
- Every time you open the controller, you need to unplug a cable from the port that's glued to the rumble bracket.
- If you are in a hurry or simply forget about needing to unplug this cable, you will likely either undo the hot glue that binds the JST port to the rumble bracket or tear off the PhobVision connection cables.
- Every time you close the controller, you should plug in the cable again, otherwise PhobVision won't be functional.
- You'll have a 3.5mm output connector near the cable outlet (some people find this aesthetically displeasing).

With these pre-soldered PhobVision brackets, issues 1-3 are 100% resolved. You (or your customer) won't need to even spend one more second when assembling or disassembling the controller. No cables need to be unplugged or plugged in. Instead, the bracket, which is inserted into the back shell, has two pogo pins (spring-loaded gold-plated connectors) sitting exactly where the PhobVision are located on the back of the PCB, so as soon as you place the back shell on the front shell & PCB, the PhobVision connections are made from the PCB to the 3.5mm port.
No soldering is required for installation (the pogo pins are pre-soldered to the 3.5mm connector with one silicone wire and one magnet wire by me). The only necessary installation steps are:
- Drilling a hole into the back shell to make room for the 3.5mm connector and trimming the surrounding support structures
- Removing the cover of the adhesive at the bottom of the PhobVision bracket and sticking it into the slot (under the D-Pad)
- Placing the 3.5mm connector into the drilled hole from the inside and tightening it with the metal nut
Detailed instructions are below.
1. Drilling the hole & trimming support structures
First, set your caliper to 13 mm (when using regular 6-pin GCC cables) / 16 mm (when using JST 6-pin headers) length. Then, position it like shown below and press the lower tip into the plastic to mark the drill position.
I personally prefer to first drill a small 1 mm hole with a micro grinder before using an 8 mm wood drill bit to drill the actual hole. (The initial 1 mm hole improves the alignment of the larger 8 mm drill bit.)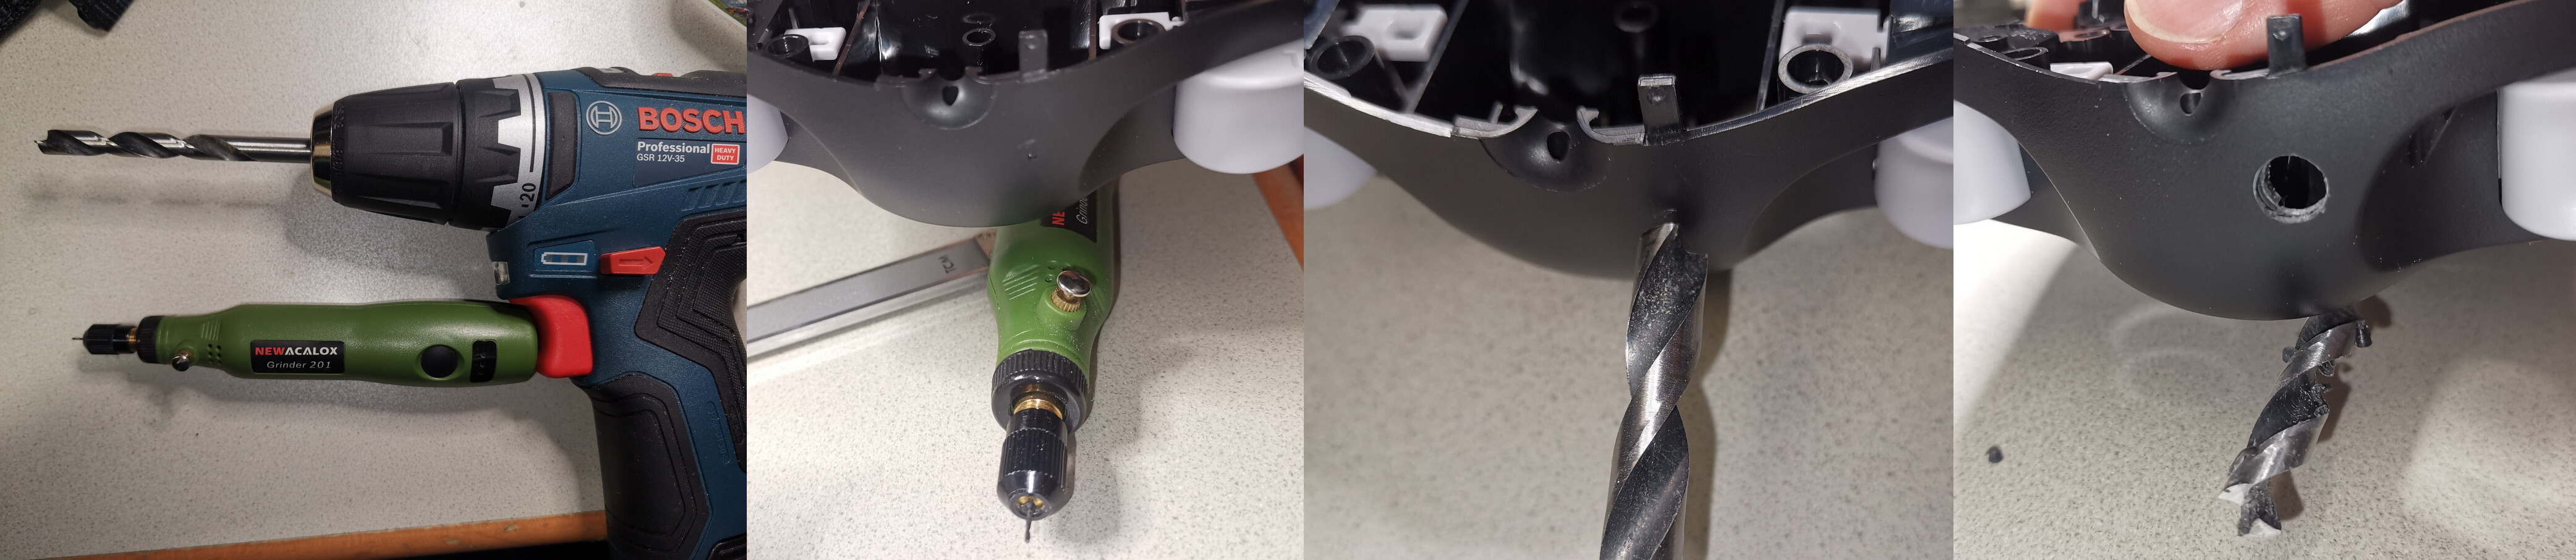
It's best to only drill at slow speeds so that the plastic won't melt.
Once the hole is drilled, use good precise side cutters (I recommend Knipex 78 61 125, highly durable, sharp and made out of hardened steel that will stay sharp for a long time, yet affordable) to trim the support wall within the circle marked in red below:
After that, you'll want to shake or blow out all the plastic dust and cuttings, and if your drill bit did not cut a very precise hole, maybe round the edge slightly with a file (I don't usually find this to be needed when drilling at a slow speed).
Now is a good time to test whether the 3.5mm connector fits through the hole well. If you can see the top part with the threading stick out as much as in the photo below, you're good to continue with step 2:
2. Placing the bracket
Remove the yellow cover of the sticky foam tape, preferably with tweezers. The sticky foam tape will make sure that the bracket won't fall out when the back shell is disassembled and you hold it upside down. (It's only of moderate binding strength, so if you want to take out the PhobVision bracket for some reason, it's still easy to do so.)
Then place the bracket into the slot below the L trigger area:
3. Placing the 3.5mm connector
Insert the threaded part into the hole (if it fell out during step 2) and bolt on the metal nut. It's enough to tighten it just with your fingers. If you press the inner part towards the back shell's top wall with one thumb, it will stay in place and have the nut latch on to it well (shown below).
Optionally you can use a 10mm hex nut to tighten it some more, but doing so risks that your hex nut scratches the back shell, so be careful.
Usage
You can use any 3.5mm to stereo RCA audio cable to output PhobVision to a CRT TV or other CVBS display, as long as you connect the red cable to the yellow CVBS input port.
The optional 3.5mm to stereo RCA cables that you can buy from me are of the AmazonBasics brand. From my tests, they are of very high quality and have very low resistance. You can of course also use them to hook up 3.5mm audio output devices to a receiver or similar devices.
PhobVision will only be output if you hold the Z button while plugging in the controller / powering on the console (or adapter).
Quality assurance
All PhobVision brackets available for sale here were tested with a PhobGCC 2.0.5 mainboard and confirmed to reliably output PhobVision by myself.


